Workflow editor tutorial
This tutorial will walk you through building RNA-seq Alignment - STAR, a workflow that aligns RNA-seq reads to a reference and outputs aligned reads, non-aligned reads, and the program log.
Objective
On this page we'll build a workflow using the CGC's publicly available tools via the workflow editor. We will build RNA-seq Alignment - STAR, a workflow that aligns RNA-seq reads to a reference and outputs aligned reads, non-aligned reads, and the program log. We encourage you to consult the manual for the STAR aligner to see the required input files for each tool.
Prerequisites
The tools we will use to build the RNA-Seq Alignment STAR workflow are available as public apps on the CGC. The process of adding the tools to the workflow will be explained in this tutorial. If you are new to the workflow editor, you might want to read the workflow editor basics before starting to create your first workflow.
Procedure
First, we'll select a project to contain our new workflow. Then, we will create a workflow and add the required tools. Lastly, we'll set app parameters and instance settings and then save the workflow.
Choose a project
- Click Projects in the top navigation bar.
- Click the project in which you wish to add the new workflow.
The project dashboard is displayed. The next step is to create the new workflow.
Create a new workflow
- Click the Apps tab in the project dashboard. The Apps page is displayed.
- Click +Add app. The window for adding an app is displayed.
- Click the Create New App tab.
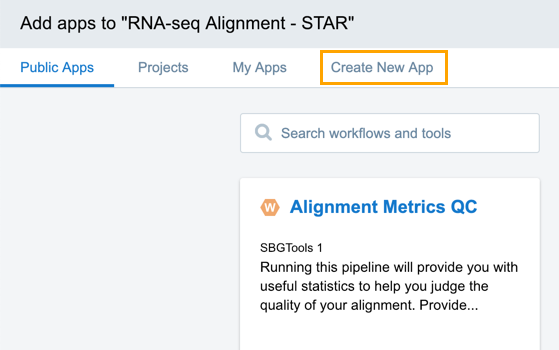
- Click Create a Workflow. The window for naming your workflow is displayed.
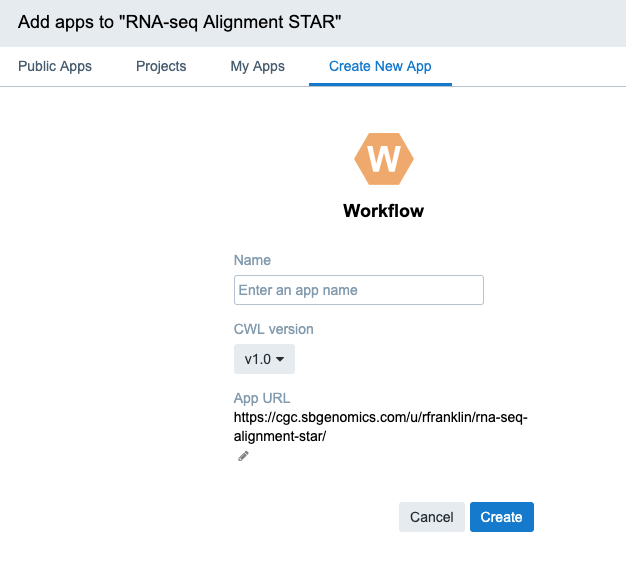
- Name your workflow RNA-seq Alignment - STAR.
- In the CWL version dropdown select v1.0.
- Click Create. The workflow editor is displayed.
The next step is to add tools to the workflow.
Add tools to the workflow
We will now add two tools to the workflow. These are are STAR and STAR Genome Generate which creates genome files required by the STAR tool.
- Select the Public Apps tab in the pane on the left.
- Type star in the search box.
- Drag and drop the STAR tool onto the canvas.
- Now, repeat these steps to find and add the STAR Genome Generate tool.
The next step is to connect the two apps.
Connect the apps
The nodes that are displayed on the workflow canvas represent apps. Hovering over a node displays descriptions of all possible connections that an app can make. These are the app's input and output ports.
They are represented by small circles on the perimeter of the node. Circles on the left of the node represent input ports whereas the ones on the right indicate output ports.
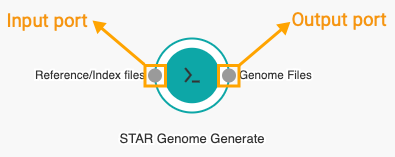
The Genome files output port on the STAR Genome Generate node needs to be connected to the Genome files input port on the STAR node, since genome files produced by STAR-GenomeGenerate will be used by STAR to properly align the RNA-Seq reads.
- Hover over the STAR-GenomeGenerate tool to display all ports.
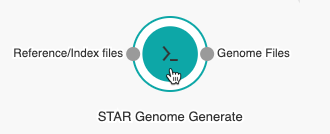
- Click the Genome files port of the STAR Genome Generate tool and drag the mouse cursor towards the STAR tool.
- Release the line at the Genome files port of the STAR tool. The tools are now connected. To undo a connection, click the line that connects the input ports and press Backspace on the keyboard.
Notice that as you click and hold the Genome files port on STAR Genome Generate, all the compatible input ports on STAR become green. These are the ports that accept the filetype outputted by the Genome files port.
Be aware that the workflow editor will allow you to connect to any of the green input ports. However, while the editor indicates connections between compatible ports, it cannot indicate whether a connection is one that the tool was designed to be used with.
The next step is to add input and output nodes.
Add input and output nodes
Now that we have connected the tools properly, we need to add input nodes to take the data we wish to process.
- Double click the STAR Genome Generate tool in the editor.
- Under the Inputs tab on the right find the Splice junction file input port.
- Click the Hide button so that it changes it status to Show. The port is now visible on the STAR Genome Generate tool in the Visual Editor.
- Click the Splice junction file input port for the STAR Genome Generate tool, drag the mouse cursor to the left side of the canvas and release it anywhere in the blank space.
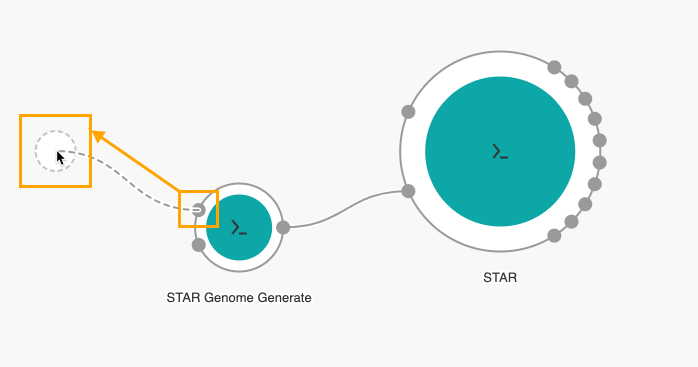
An input node labelled sjdbGTFfile will be added to the canvas.
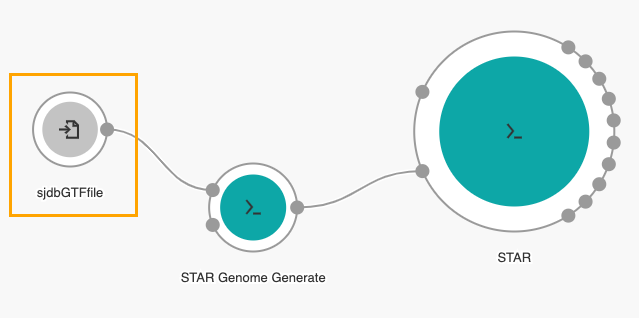
- Next, double click the STAR tool in the Visual Editor.
- Under the Inputs tab on the right find the Splice junction file input port.
- Click the Hide button so that it changes it status to Show. The port is now visible on the STAR tool in the Visual Editor.
- Connect the Splice junction file input port of the STAR tool with the sjdbGTFfile input node.
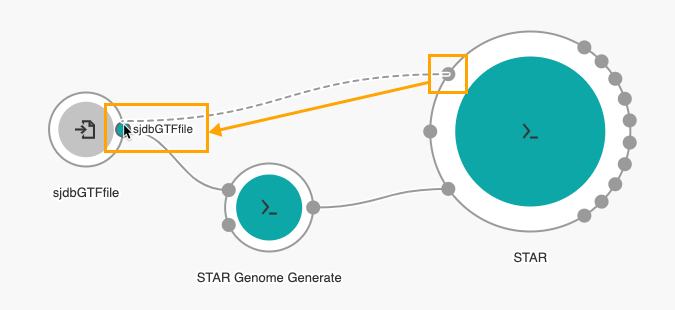
If several tools require the same input file, you can create one input node and connect it to more than one app.
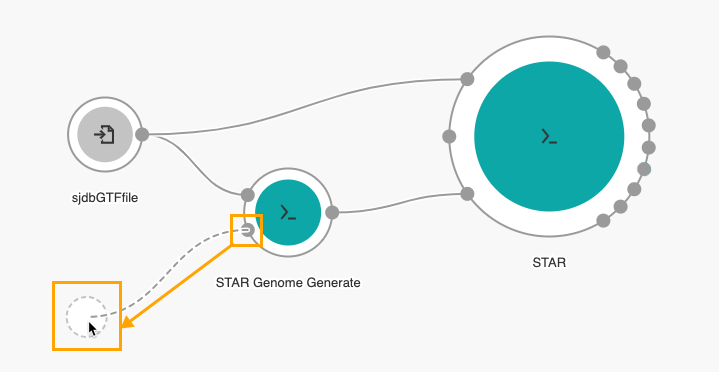
9. Drag the Reference/Index files port of the STAR Genome Generate tool to the left side of the canvas to add another input node, as shown below.
The next step is to add the FASTQ Quality Detector tool.
Add the SBG FASTQ Quality Detector tool
In our workflow, RNA-Seq Alignment STAR, we first run the read sequences using the SBG FASTQ Quality Detector tool. This tool automatically detects the quality encoding scheme of the reads and writes this data in the appropriate metadata field. This enables downstream tools to recognize the quality of each base call.
For the Read Sequence (required) port on the STAR node, we will use a Batch Input node because the workflow can be executed in parallel for multiple groups of files inputted to it. Before we can add this input node, we have to first add the SBG FASTQ Quality Detector tool.
- Search for SBG FASTQ Quality Detector under the Public Apps tab on the left.
- Drag and drop the tool onto the canvas.
- Connect the Read sequence input port of STAR to the Result output port of the SBG FASTQ Quality Detector node.
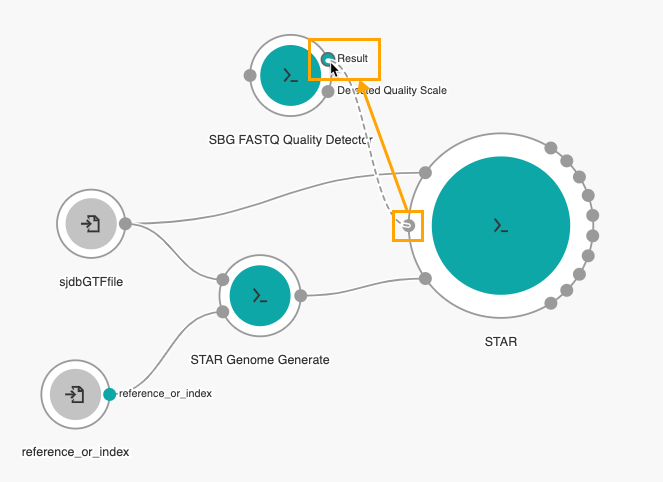
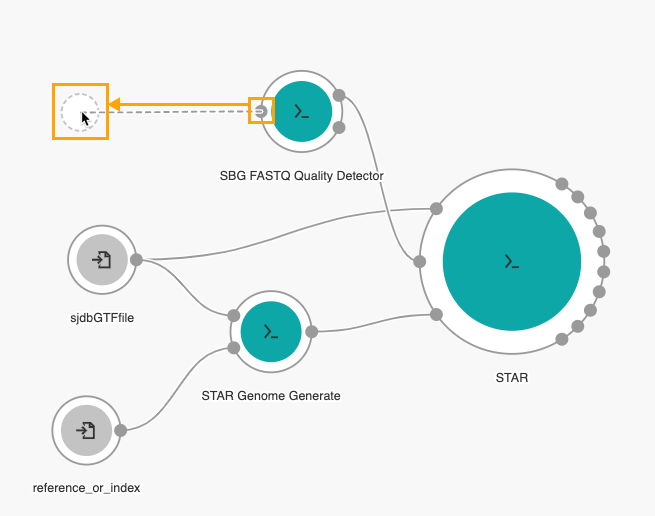
Then, drag the Fastq input port on the SBG FASTQ Quality Detector node to the left side of the canvas to add an input node.
The next step is adding the Picard SortSAM tool to the workflow.
Add Picard SortSAM to the workflow
Before we can add output nodes to our workflow, we need to add the Picard SortSAM tool. This tool is needed in order to sort the generated BAM file by coordinates and allow faster random access to it.
- In the Public Apps tab on the left search for Picard SortSAM.
- Drag and drop the tool to the canvas.
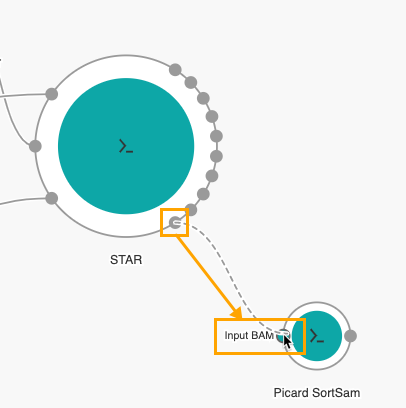
- Connect the Aligned SAM/BAM output port on STAR to the Input BAM port on Picard SortSAM.
The next step is to add the output nodes.
Add output nodes
Just as we added input nodes to input files, we need to add output nodes to collect the data returned by our analysis.
You can add output nodes to your workflow by clicking a tool's output port and dragging the connector to the right side of the canvas.
- Click the output node.
- Drag and drop to the right side of the canvas.
- Do these steps to add nodes for all nine remaining available output ports of the STAR tool:
- Wiggle files
- Unmapped reads
- Transcriptome alignments
- Splice junctions
- Reads per gene
- Log files
- Intermediate genome files
- Chimeric junctions
- Chimeric alignments
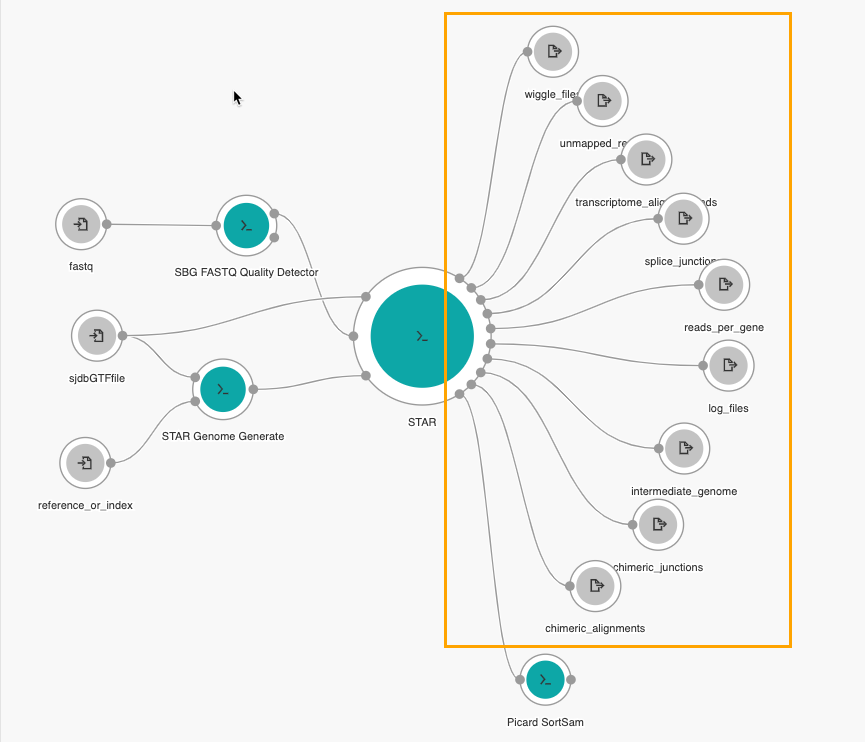
The last step is adding an output node from Picard SortSAM's output port. Since we added Picard SortSAM to the Aligned SAM/BAM output port on STAR, we'll need to collect its data.
It is possible to connect multiple output ports to a single output node. However, we prefer to create individual output nodes for each different output file type. This way, it is easier to discern individual output files visually on the canvas.
Note that output files generated in an intermediate step can easily be connected to another node as an input file; we do not need to use an output node to pass an output file to a subsequent tool.
However, inserting output nodes in the middle of a workflow lets us collect and save these intermediate files created as part of the workflow execution.
Set app parameters
In order for this workflow to run properly, certain app parameters need to be set to the appropriate values.
- Click on the STAR node.
- In the object inspector on the right scroll down to the APP PARAMETERS section.
- Take a look at the different parameters that you can change.
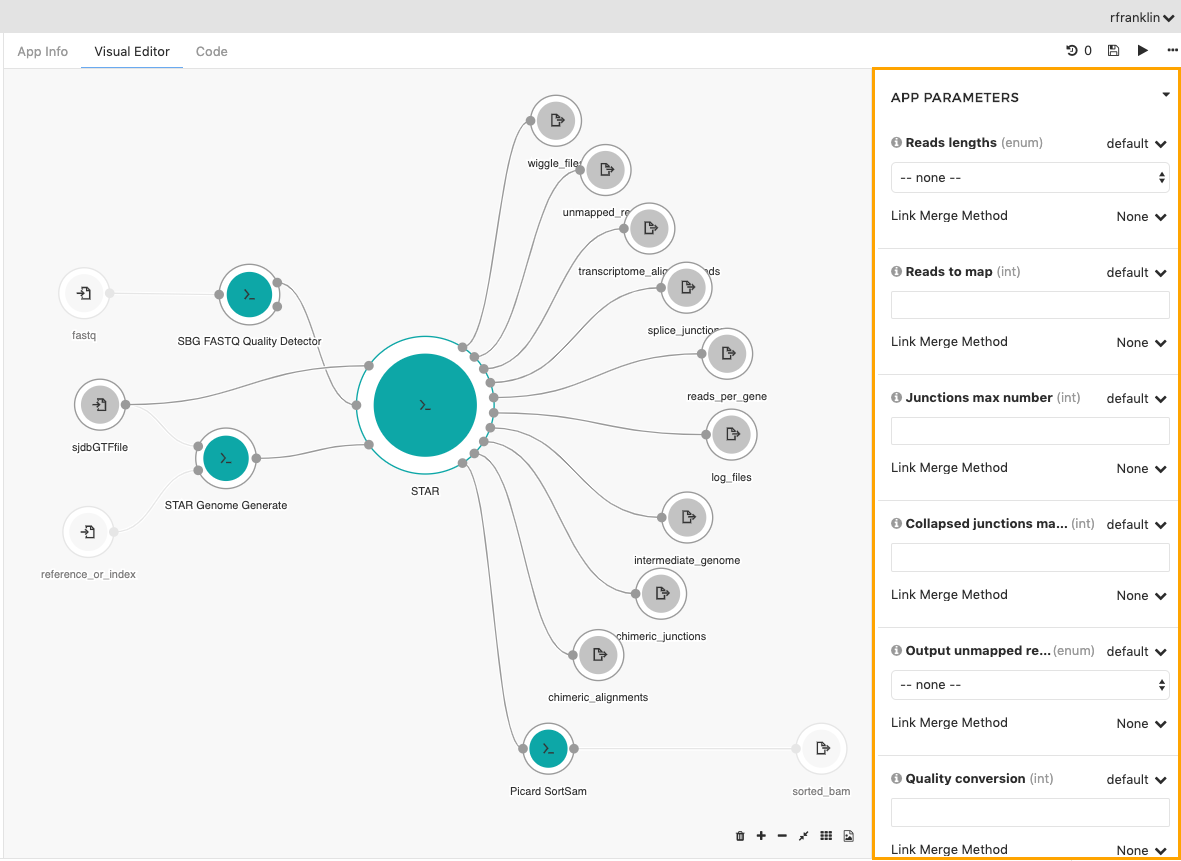
If value next to the parameter name is set to exposed, you can change the value of the parameter on the task page before running the workflow. This gives you easy access to some parameters just before starting a new task, without needing to come back to the workflow editor.
Save the new workflow
- Click the Save icon in the upper right corner.
- Describe the changes you made (optional).
- Click Save.

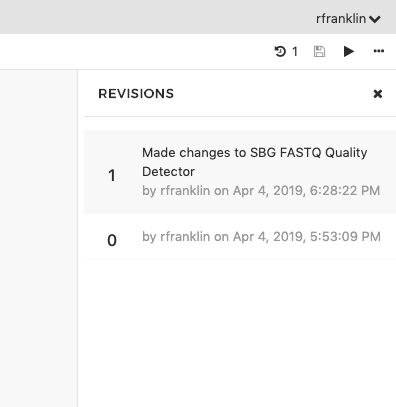
Your workflow is now saved. Notice that the Revision number next to your workflow name in the top right corner has increased by 1 (for instance, it originally reads 0 but has increased to 1 after you save your workflow for the first time).
By clicking on the revision icon, you can always choose to go back to an earlier saved version of your workflow from the drop-down menu, as shown below.
And that's it! We've created an RNA-seq Alignment - STAR workflow from scratch in the workflow editor.
Updated almost 3 years ago
