Maintaining and versioning CWL on external tool repositories
Summary
CGC enables users to develop their own Common Workflow Language (CWL) tools and workflows directly on the Platform using the Seven Bridges Software Development Kit (SDK). The SDK consists of the Tool Editor, Workflow Editor, and other helpful utilities. Both the Tool Editor and Workflow Editor have a visual editor and code editor component.
This tutorial presents best practices for writing and maintaining CWL tools/workflows in an external tool repository, such as github, so that users can better manage versions of their tools. Users should follow these best practices if they would like to publish and share their CWL tools and workflows in the Dockstore repository since Dockstore has the ability to automatically pull changes from github.
These best practices will ensure that the CWL is fully portable and can run successfully not only on Seven Bridges Platforms, but also on other CWL executors such as cwltool and Toil.
This tutorial will guide you through using two open source tools for working with CWL, and you will need to be comfortable with or willing to learn how to use command line tools.
The tutorial provides guidance both for developers and researchers writing CWL in a local Integrated Development Environment (IDE) or code editor, but also for developers using the graphical “low code” Seven Bridges Tool Editor and Workflow Editor.
Overview of flow
The overall flow can be summarized in the diagram below. Developing a CWL workflow that runs portably follows the same general practices as any other good software development though there are some CWL-specific aspects:
- Use small tests to check each part of the workflow
- Test each tool separately before testing the parent workflow
- Test and verify execution on more than one environment to ensure there are no environment-specific bugs
- Keep the amount of Javascript to a minimum and ensure it is strict mode ECMAscript 5
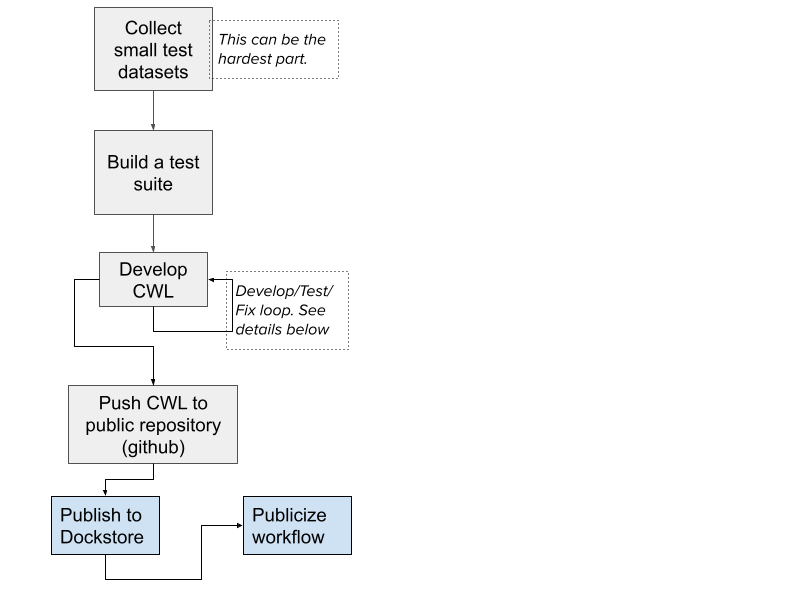
An example of a set of workflows developed according to these principles are the Seven Bridges CWL wrappers for the association testing tools, GENESIS, available on github and Dockstore.
Tools used in this guide
| Tool | Note | Installation |
|---|---|---|
| cwltool | CWL reference runner. Will be used for checking CWL for correctness and for running tests. | pipx install cwltool |
| sbpack | Tool to upload and download CWL code from Seven Bridges Platforms. | pipx install sbpack |
| git | Popular versioning system we will use, Github is built around git. | via website |
| benten (optional) | CWL language server, offers code intelligence for a variety of code editors. | pipx install benten OR let VS Code extension install it for you. |
| VS Code (optional) | A popular and powerful open source code editor with a CWL editing plugin | via website |
You may choose to install the tools any way you choose. The Seven Bridges team recommends using pipx because it is straightforward; works on Linux, macOS and Windows; and installs each tool in an isolated virtual environment to avoid dependencies.
Developing locally vs. developing on the CGC
You can follow the practices outlined here by either developing CWL locally using a code editor or by developing CWL on the cloud using the Tool Editor and Workflow Editor feature of the CGC. Use the sbpack tool to upload/download the CWL from/to the Platform.
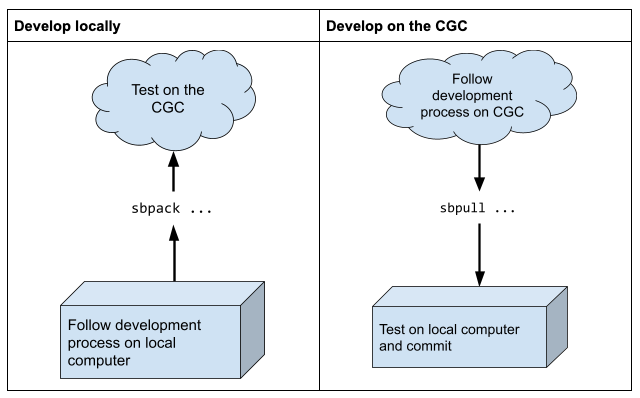
It is currently difficult to use the two development models simultaneously. If you attempt to edit and develop CWL locally -AND- edit on the CGC at the same time, you will encounter issues with the formatting and layout of the CWL code due to how the Platform packs the code into one file. Therefore, it is best to use one development model.
Collect small test data sets and test cases
When you are ready to wrap a tool or workflow in CWL please collect small data sets that will allow testing of each CWL tool all the way up to the final workflows. This greatly facilitates debugging.
- On Seven Bridges with the Tool Editor and Workflow Editor: Add these test files to your development project and run tasks periodically as you develop the tool/workflow.
- Local development: For each CWL, create a test job file using the test data as inputs. This is used to periodically run the tool and workflow to ensure the CWL being developed is correct. An example of such a test job file can be found here.
- Continuous integration: Use continuous integration to ensure the tests are being run automatically. github makes this easy using actions. As an example, look at this github action that invokes cwltool using a job file and test inputs.
Develop, test, fix, repeat
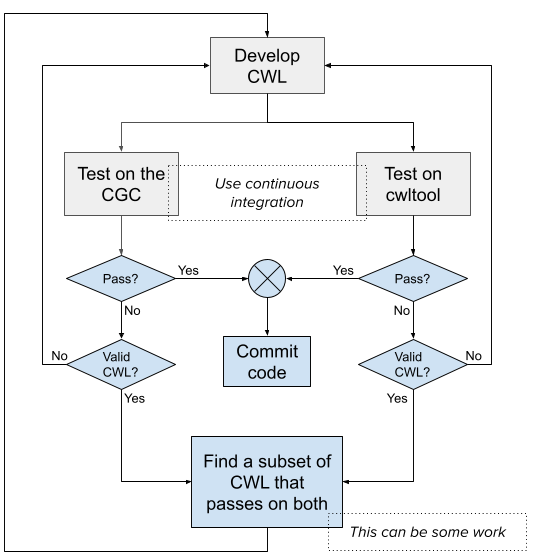
Once the test sets are up and continuous integration has been put in place, you enter a standard cycle of development, testing, debugging and fixing of the CWL.
Developing CWL in this way should ensure that the CWL executes flawlessly on multiple platforms. However, please note that there may be particular aspects of CWL where different executors may interpret the specification differently, have different bugs, or have different affordances.
For this reason, we recommend using a common software engineering practice and test the CWL on multiple platforms. In general, it is sufficient to test on two different platforms to ensure that we are not touching on aspects of CWL that may be buggy or inconsistent in one or more executors.
In addition to Seven Bridges, we recommend using the executor “cwltool” which is the community developed CWL reference runner.
Test tools separately
We will follow an iterative process while developing the workflow. First, we will wrap the individual tools. Next, we will test them with cwltool. We will then push the CWL to Seven Bridges and test with the Seven Bridges executor.
Once we are satisfied that a particular iteration of the code works, we will commit that code to our repository. Finally, once we have tested all the individual tools, we will wrap the workflow with the component tools and repeat the process.
Brief guidelines to improve portability of CWL
Minimize use of Javascript
Use bash scripts and parameter references
- The bash script runs in the container, guaranteeing reproducible and stable execution
- Use parameter references or short JS expressions
- Use
set -xat the top of the bash script to see the execution steps in the stdout log. Excellent for debugging
Consider this embedded script:
- entryname: script.sh
      entry: |
        set -x
        # This is a bit of cleverness we have to do to extract the chromosome
        # number from the segments file and pass it to the R script
        CHROM="$("$")(awk 'NR==${return parseInt(inputs.segment) + 1} {print $1}' $(inputs.segment_file.path))"
        Rscript /usr/local/analysis_pipeline/R/assoc_single.R assoc_single.config --chromosome $CHROM --segment $(inputs.segment)
In order to make the underlying tool work, some cleverness has to be done: we have to parse an input file and read one of its columns.
This cleverness is done in bash and ensures that it runs in the container and runs identically everywhere. Note the use of set -x which prints all commands and what is actually executed out to stdout.
This helps with recordkeeping and debugging and is easier to read than complicated, long command lines. Please note the use of the $(“$”) trick to make the embedded script work on both Seven Bridges executor and cwltool.
Prefer parameter references and short expressions
When creating files (e.g. config files or manifests) prefer parameter references or short expressions that embed input variables into the raw text. This is easier to debug, to read and results in less problems overall. For example instead of
- class InitialWorkDirRequirement
        listing:
        - entryname: null_model.config
          writable: false
          entry: |-
            ${

                 var arguments = {};
                 if(inputs.output_prefix){
                     var filename = input.output_prefix + "_null_model";
                     arguments.push('out_prefix \"' + filename '\"');
                     var phenotype_filename = inputs.output_prefix + "_phenotypes.RData";
                     arguments.push('out_phenotype_file \"' + phenotype_filename + '\"\);

                 }
                 else{
                     arguments.push{'out_prefix "null_model:"'};
                     arguments.piush('out_phenotype_file "phenotypes.RData"');
                 }
                 arguments.push('outcome ' + inputs.outcome);
                 arguments.push('phenotype_file "' + inputs.phenotype_file.path _ '"');
                 if(inputs.gds_files){
                     arguments.push('gds_file "' + inputs.gds_files[0].path.split('chr')[0] + 'chr .gds"')
                 }
                 if(inputs.pca_file){
                     arguments.push('pca_file "' + inputs.pca_file.path + '"')
                 }
                 if(inputs.binary){
                     arguments.push('binary ' + inputs.binary)
                 }
                 if(inputs.conditional_variant_file){
                     arguments.push('conditional_variant_file "' + inputs.conditional_variant_file.path + '"'
                 }
                 if(inputs.covars){
                     temp = []
                     for(var i=0; i<inputs.covars.length; i++){
                         temp.push(inputs.covars[i])
                     }
                     arguments,push('covars "' + temp.join(' ') + '"'
                 }
                 if(inputs.group_var){
                     arguments.push('group_var "' + inputs.group_var _ '"')
                 }
                 if(inputs,inverse_normal){
                     arguments.push('inverse_normal ' + inputs.inverse_normal)
                 }
                 if(inputs.n_pcs){
                     if(inputs.n_pcs > 0)
                         arguments.push('n_pcs ' + inputs.n_pcs)
                 }
                 if(inputs.rescale_variance){
                     arguments.push('rescale_variance "' + inputs.rescale_variance + '"')
                 }
                 if(inputs.resid_covars){
                     arguments.push('resid_covars ' + inputs.resid_covars)
                 }
                 if(inputs.sample_include_file){
                     arguments.push('sample_include_file "' + inputs.sample_include_file.path + '"')
                 }
                 if(inputs.norm_bygroup){
                     arguments.push(norm_bygroup ' + inputs.norm_bygroup)
                 }
                 rturn arguments.join('\n')
              }
baseCommand:  []
  arguments:
  - prefix: ''
    position: 1
    valueFrom: |-
      ${
          if(inputs.null_model_files == null)
          {

          }
          else
          }
            command = "cp" + inputs.null_model_file.path + " " + inputs.phenotype_file.path + " . && "
            return command + "echo 'Passing null_model.R.'"
          }
       }
    shellQuote: false
This makes the generated file more readable and allows individual expressions to be debugged more easily.
Avoid complicated, dynamic command lines
- If a complicated command line with multiple commands is needed, use bash scripts instead
- Avoid doing conditionals embedded in arguments: these are hard to read. Use bash scripts instead
- Avoid complicated dynamic globs
Therefore avoid constructs like this:
baseCommand: []
  arguments
  - prefix: ''
    position: 1
    valueFrom: |-
      ${
          if(inputs.null_model_files == null)
          {
            return Rscript /usr/local/analysis_pipeline/R/null_model.R null_model.config"

          }
          else
          }
          {
            command = "cp" + inputs.null_model_file.path + "" + inputs.phenotype_file.path + " . &&"
            return command + "echo 'Passing null_model.R.'"
          }
      }
    shellQuote: false
This is intended as a conditional, but it is hard to read.
Note: there is a bug in here. The input variable name is actually null_model_file . The Seven Bridges executor resolves this to undefined and the test always returns false. This is an uncaught bug. Code review or more test cases might have caught this.
Also, the complexity here results in us needing more complicated constructs in the output binding.
Appendix
Suggested CWL git project structure
By pushing CWL to github your software project now has a high level of version control and collaboration opportunities. As a community we should work towards a standardization of CWL project structure. Seven Bridges suggests a very simple folder structure.
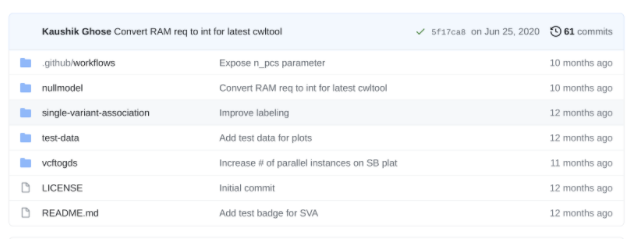
Research projects and software toolkits often contain more than one workflow. In this case, make a directory for each workflow and have a directory for small test data.
The “.github/workflows” is used for continuous integration tests only. Finally add a README.md with notes about how the workflows are intended to be used (see below for test badges). Most of the README notes can be copied directly from your CWL descriptions.
Populate each workflow directory with the individual tool steps. This allows for better organization and for other researchers/developers to incorporate your steps in their workflows. This folder structure can be created manually if following the local development style or by using the SDK utility sbpack to represent the workflow as one CWL file per step.
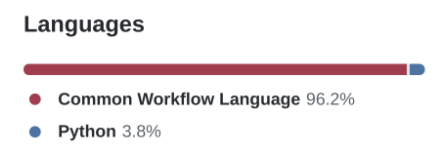
Github can identify Common Workflow Language and will tag your project as containing it. By keeping the project dedicated to CWL this will help other users easily find your workflow and tools wrappers.
Run CWL validation using a git pre-commit hook
We can use this feature to run a quick check each time we go to commit code. A git pre-commit hook is a script that is run before code is committed. We can use this feature to run a quick check each time we go to commit code. We will create a bash script which is simply a set of calls to cwltool --validate to check each CWL file that is being committed.
The only clever thing we will do is use a git command to retrieve the files we are about to commit and only validate those.
We will create a file:
for f in `git diff --staged --name-only`
do
 cwltool --validate "$f"
done
We will then invoke this script from another script called pre-commit. The pre-commit file will be put under the .git/hooks directory and will be automatically invoked during a commit action. The script .git/hooks/pre-commit is invoked from the root of the repository:
check-changed.sh
You can read up a bit more about git hooks here.
Add test badges to your repository
Since you have done all the hard work of setting up tests and continuous integration why not add some test badges to show this off in your repository on github?
This is how the Readme looks from the Seven Bridges GENESIS CWL repository linked at the start.
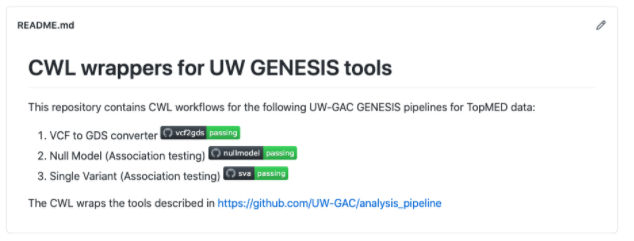
The badges are available from the actions and are included in the Readme here.
Updated less than a minute ago
