Local development
Developers have freedom to develop the app however they want, especially if the app does not have to communicate with the Platform (accessing project files, exporting files, etc). It is, however, recommended to follow some standard principles like using renv, git, golem framework, writing tests, etc.
The final output of the development should be a Docker image containing the application, which should then be pushed to the Platform’s internal Docker registry:cgc-images.sbgenomics.com. Learn more about the Docker registry.
Below you will find some guidelines on what to consider when building Docker images.
It is recommended to use the appropriate base image built on the amd64 linux architecture.
When building the docker image and adding app files, the app project directory should be placed in the instance root directory containing all necessary app files, or the app should be installed as a package (if using golem).

Please make sure to install all necessary dependencies for your web app.
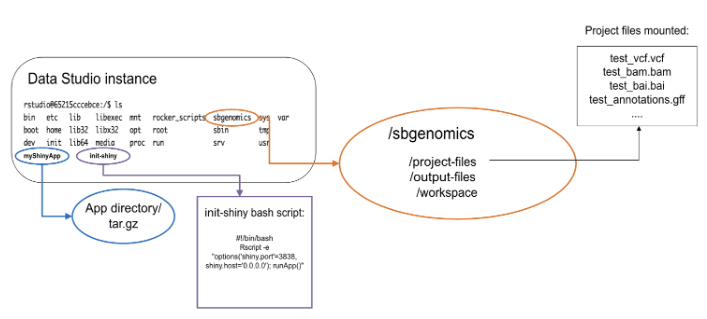
If you want to use Platform files in the app or export outputs of the app to the Platform, you will have to assume the existence of the sbgenomics directory in the root directory of the instance where the app would run during local development. As mentioned before, this folder contains the following subdirectories:
sbgenomics/project-filessbgenomics/output-filessbgenomics/workspace
To work with these folders on the instance, you would have to set absolute paths to them:
/sbgenomics/project-files/sbgenomics/output-files/sbgenomics/workspace
Besides this interaction with the Platform, a command for running the app has to be specified, including the port and the runApp command. The specifics of this command may vary depending on whether you are using the Golem framework or developing a standard - "vanilla” Shiny app.
This command should be included in a bash file named init-shiny, which should be created separately - outside the app project directory so that it ends up in the instance root directory. The app should be running on port 3838.
An example of the init-shiny file:
#!/bin/bash

R -e "options('shiny.port'=3838,shiny.host='0.0.0.0');OmicCircosShiny::run_app()"
This can also be achieved via a Dockerfile build. You can add this segment to your Dockerfile (to be modified in accordance with the specific use case):
RUN touch init-shiny

EXPOSE 3838

# Create the init-shiny file with the shebang and the R code

RUN echo "#!/bin/bash" > /init-shiny && \

    echo "Rscript -e \"options('shiny.port'=3838, shiny.host='0.0.0.0'); OmicCircosShiny::run_app()\"" >> /init-shiny


# Make init-shiny file fully readable, writable, and executable

RUN chmod 777 /init-shiny
This example demonstrates how we created init-shiny file for running the OmicCircos application.
Since the app is developed using the R Golem framework, we must call the run_app() function and set options beforehand. For non-golem apps, where the command to run the app is runApp(), you would have to set something like:
"Rscript -e \"options('shiny.port'=3838, shiny.host='0.0.0.0'); runApp(appDir = ‘/<appDirName>’)\"
Lastly, as stated before, the output of the development should be a Docker image pushed to the Platform’s internal Docker registry and made public (read more on making your image public).
Below you will find an example of the Dockerfile we used for OmicCircos app deployment.
FROM rocker/shiny:4.1.3

RUN apt-get update && apt-get install -y  git-core libcurl4-openssl-dev libgit2-dev libicu-dev libssl-dev libxml2-dev make pandoc pandoc-citeproc zlib1g-dev curl && rm -rf /var/lib/apt/lists/*

RUN echo "options(repos = c(CRAN = 'https://packagemanager.rstudio.com/all/__linux__/focal/latest'), download.file.method = 'libcurl', Ncpus = 4)" >> /usr/local/lib/R/etc/Rprofile.site

RUN touch init-shiny

RUN R -e 'install.packages("remotes")'

RUN mkdir /omiccircos

ADD renv / omiccircos

ADD renv.lock /omiccircos

WORKDIR /omiccircos

ENV RENV_CONFIG_REPOS_OVERRIDE=https://packagemanager.rstudio.com/all/__linux__/focal/latest

RUN Rscript -e 'remotes::install_version("renv", version = "0.16", force = TRUE); renv::restore(lockfile = "renv.lock", library = .libPaths())'

ADD . /omiccircos

RUN R -e 'install.packages(".", type = "source", dependencies=FALSE, repos = NULL)'

EXPOSE 3838

RUN echo "options('shiny.port'=3838,shiny.host='0.0.0.0');OmicCircosShiny::run_app()" >> /init-shiny

CMD R -e "options('shiny.port'=3838,shiny.host='0.0.0.0');OmicCircosShiny::run_app()"
Please note that at the end of Dockerfile, we suggest you put CMD. This command will be overwritten by init-shiny command anyway.
The final step in app publishing requires the involvement of our Support team. You should submit a request and provide us with the information required for publication (further explained in Development in the Data Studio and custom environments).
Updated over 1 year ago
