dbGaP Submission Form Suite
Overview
dbGaP Submission Form Suite is an app that allows you to easily import, map and prepare your data for import into the database of Genotypes and Phenotypes (dbGaP). The app does not submit any data to dbGaP, but allows you to prepare the proper submission format and accelerate the submission process, as shown below.
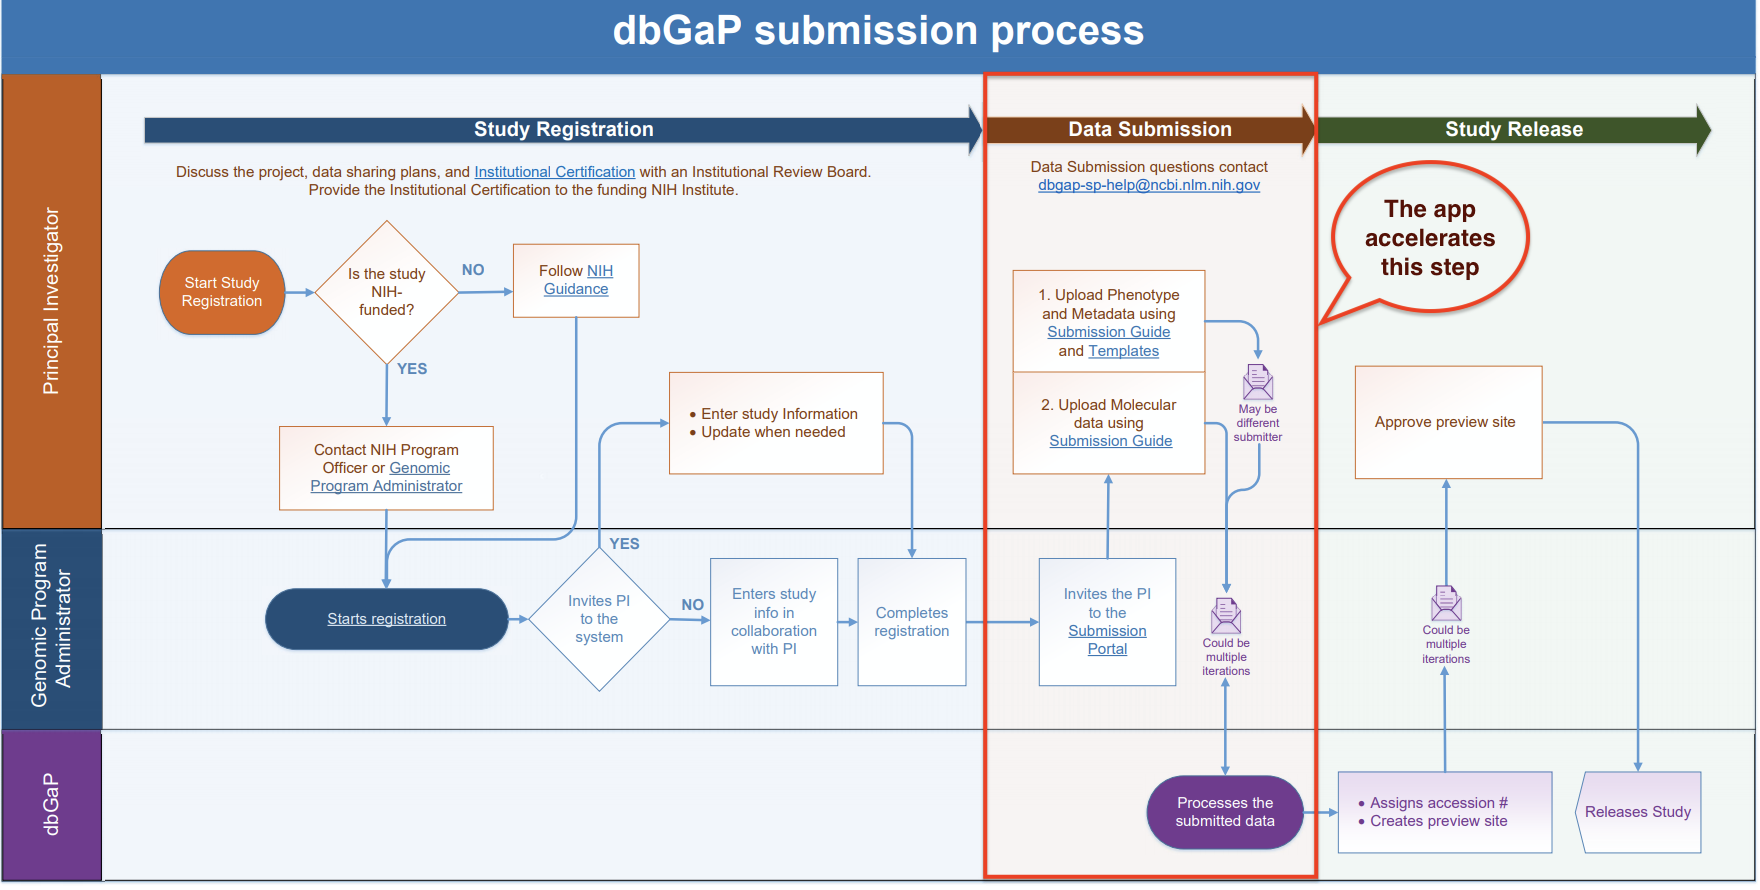
The dbGaP Submission Form Suite is currently in its BETA stage. Please send any feedback or suggestions to [email protected].
Access the dbGaP Submission Form Suite app
To access the dbGaP Submission Form Suite app on the CGC, follow the steps below:
- Log in to the CGC.
- Create or open a project that you want to use for data manipulation with the app. If you don't already have the data in a project on the CGC, you can upload it beforehand. Note that the data doesn't have to be in the same project from which you are launching the app.
- Click the Interactive Browsers tab. Available interactive apps are displayed.
- Scroll down to the Custom interactive apps section to find the dbGaP Submission App card.
- On the dbGaP Submission App card, click Open. The app opens in a new tab.
- Click Yes to allow the app to access your CGC resources. The app's landing screen is displayed and you can now start loading data
The following options are available on the landing screen:
- dbGaP Form Creator: Opens the dbGaP Submission Worksheet tab inside the app.
- Need Help: Opens this guide.
Load an input manifest file
To load an input manifest file, select the dbGaP Submission Worksheet tab on the app's top navigation bar. This displays the manifest input selection screen.
Supported file format for input manifest files is a single-sheet .xlsx file with column names in the first row.
To load a manifest file, follow the steps below:
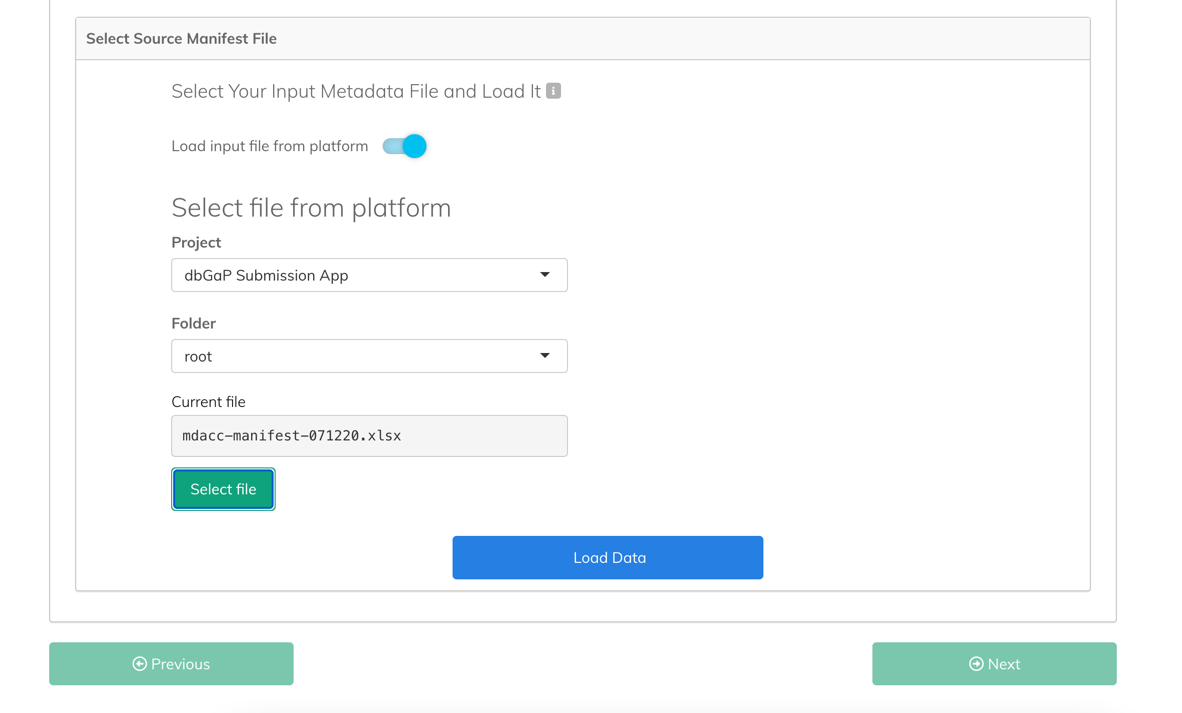
- Select the Project from which you want to load the file. Please wait until the folder list is populated as it might take several seconds with a larger number of folders.
- Select the Folder within the project that contains the file you want to load. Available options are either the project's root folder, or the folders from the first level of folder structure. Files that are located deeper inside the project's folder structure can't be loaded directly.
- Click Select file. A new window opens, displaying available files from the selected project folder.
- Select the file you want to use as your manifest file and click Pick file. Once the file has been loaded, you can start the configuration and mapping process.
- Click Load Data. The file structure and content is validated. If the validation is completed successfully, two additional panes are displayed:
- Uploaded File Content: Contains a table showing the data present in the file. You have the options to sort and filter data for preview purposes, but these actions won't affect the actual data in any way.
- Uploaded File Summary: Shows charts that represent the structure of uploaded data, as well as missing data from each of the columns present in the loaded file.
- Click Next. You can now start mapping data.
Step 1: Subject and Sample (SSM DS)
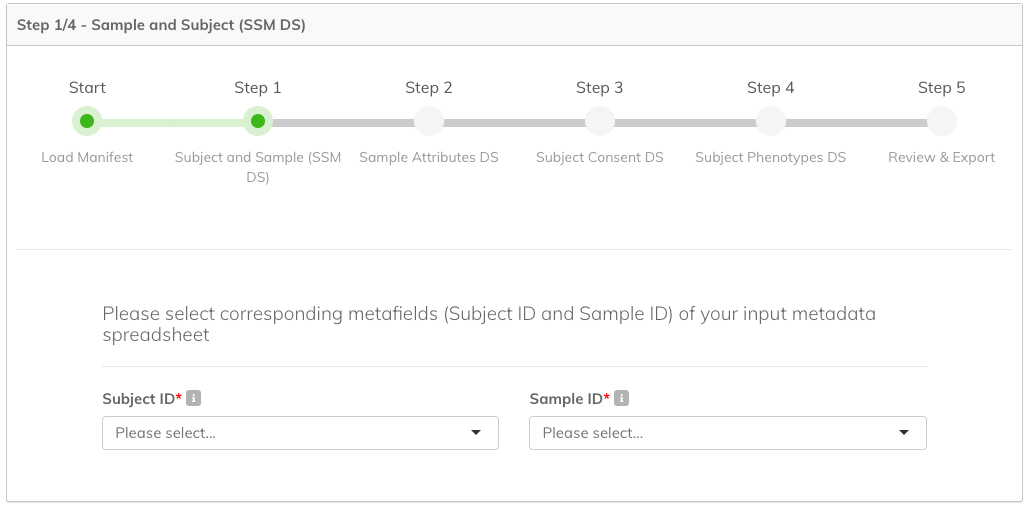
In this step you need to select corresponding metafields of your input metadata spreadsheet for the following fields:
- Subject ID (required): Select the column that contains the unique IDs of study participants (subjects). Expected data type for the column is string.
- Sample ID (required): Select the column that contains IDs for each of the samples. A Sample ID is a biological aliquot from a person and is the primary key for the molecular data. Expected data type for the column is also string.
Add any additional (optional) fields and their mapping:
- Click Add New Field. The Add new optional field dialog opens.
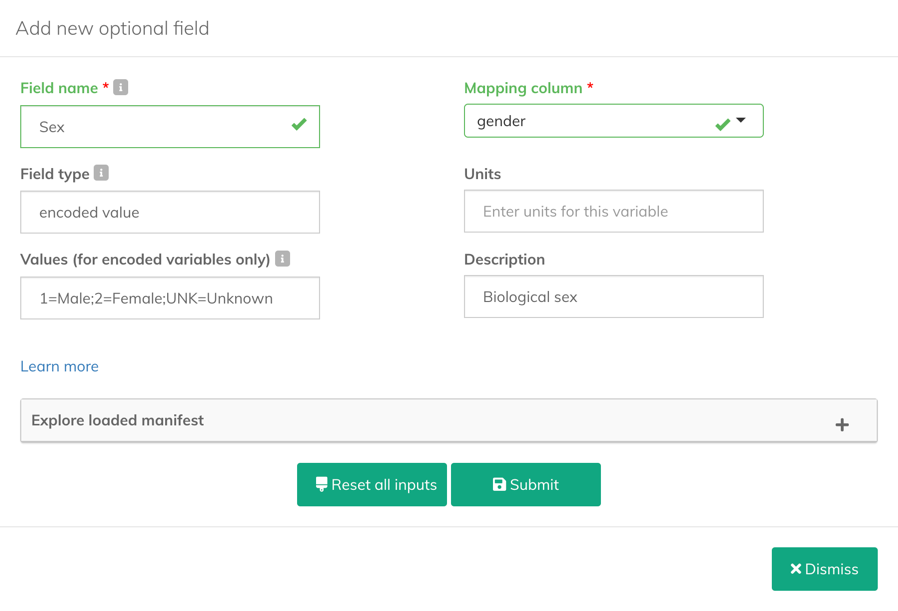
- Enter the information for the new field:
- Field name (required): Define the name for the field you are adding.
- Mapping column (required): Select the column in the manifest file which the new field will be mapped to.
- Field type: Enter the value type of the field you want to add. For encoded fields, enter
encoded value. - Units: Enter the measurement units for the values contained in the field.
- Values (for encoded fields only): Enter all unique value for the encoded field in the
value=description;value=descriptionformat (separated by semicolons). For example,1=Male;2=Female;UNK=Unknown. - Description: Enter a text description that provides more details about the field.
To refer to the structure of the loaded manifest file at any time while adding a new field, click Explore loaded manifest.
3. Click Submit. A new optional field mapping is added.
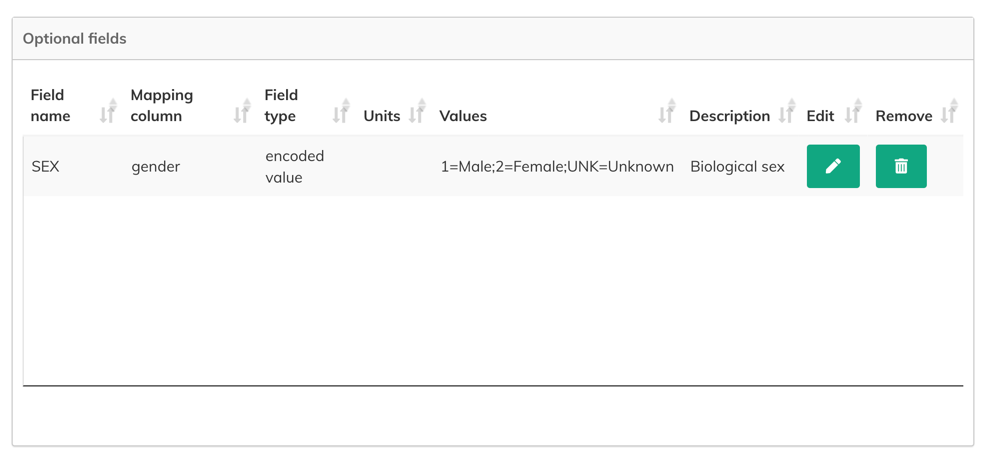
Once added, optional fields can be edited () or deleted ().
Click Next to continue.
Step 2: Sample Attributes DS
In this step you need to select the following required attribute values:
- Sample ID (required): The column that contains IDs for each of the samples. A Sample ID is a biological aliquot from a person and is the primary key for the molecular data. Expected data type for this field is string.
Add any optional fields.
Click Next to continue.
Step 3: Subject Consent DS
In this step you need to link the consent information with Subject ID, by selecting columns for the following fields:
- Subject ID (required): Select the column that contains the unique IDs of study participants (subjects). Expected data type for this field is string.
- Consent (required): Select the column that contains the single consent value for each person using a value encoded in the DD.
- Consent encoded values: Enter all unique values and descriptions of all encoded consent values in the following format:
value=description;value=description. Note that these value-description pairs should be separated by semicolons. For example,1=General Research Use (NPU);2=Health/Medical/Biomedical (GSO).
Add any optional fields.
Click Next to continue.
Step 4: Subject Phenotypes DS
In this step you need to link phenotypic data with Subject ID, by selecting columns for the following fields:
- Subject ID (required): Select the column that contains the unique IDs of study participants (subjects). Expected data type for this field is string.
Add any optional fields.
Click Next to continue.
Step 5: Review and Export
The final step allows you to review the mapped data and export it for submission to dbGaP. Before export, you can preview the data in the Generated dbGaP Submission Document Preview pane.
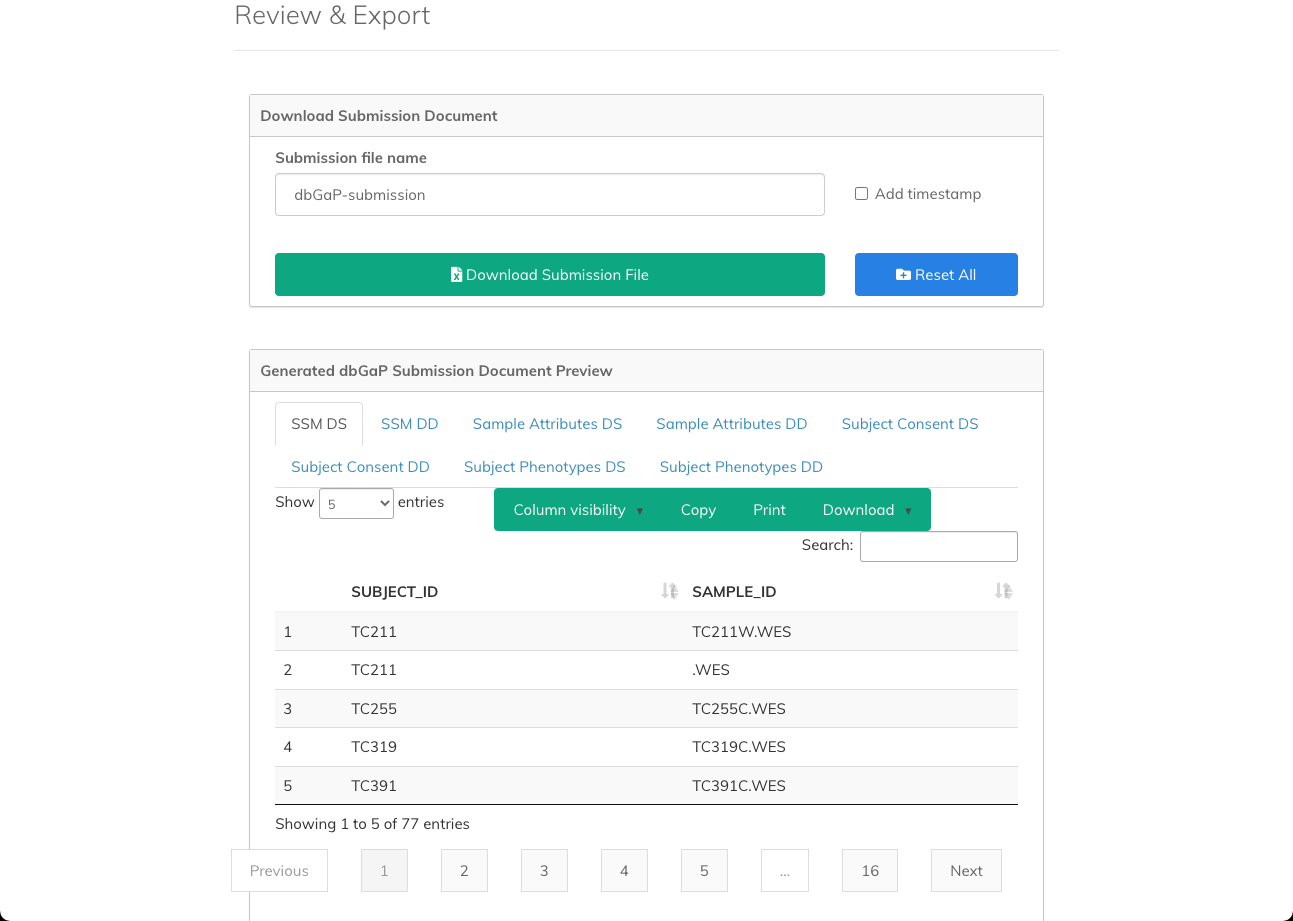
To export a file for submission to dbGaP, use the controls in the Download Submission Document pane by following the steps below:
- In the Submission file name field enter the name for the exported file.
- (Optional) Click Add timestamp to append the timestamp to the defined file name.
- Click Download Submission File. The file is downloaded to your computer.
To start the file loading and mapping process from the very beginning click Reset all. This will reset all loaded and mapping data and let you start the process again.
Updated over 3 years ago
