
Tag your files
Overview
You can tag your files with keywords or strings on the CGC to make it easier to identify and organize files you’ve imported from public datasets.
The tags will help you visually keep track of files as you import them into your project from the Data Browser or from the Public Reference Files repository.
You can also tag files you copy between projects. These tags allow you to sort and filter files within a project and on the DRAFT task page.
Tag files during upload
Learn more about tagging files as you upload them via the command line, or from an FTP or HTTP(S) server.
Add tags when copying files
Copying files from the Data Browser
When you copy files from the Data Browser, you will be prompted to tag your files as you import them into a project.
To tag your files, first copy them from the Data Browser to your project:
- Navigate to the Data Browser by selecting Data from the top navigation bar and clicking on Data Browser from the drop-down menu.
- Populate the Data Browser with a query.
- Copy files to project.
- Choose the target project for copying files.
- Enter one or more tags, separated by commas or by the return key, into the box below Tag files. Any previously used tags in your selected project will be autosuggested.

- When you are finished tagging your files, click Copy selected files.
Copying files from the Public Reference Files repository
When you copy files from the Public Reference Files repository, you will be prompted to tag your files as you import them into a project.
To tag your files, first copy them from the Public Reference Files to your project:
- Navigate to Public Reference Files by selecting Data from the top navigation bar and clicking Public Reference Files from the drop-down menu.
- Select the files.
- Click Copy, and select the target project.

- Enter one or more tags, separated by commas, into the box. Any previously used tags in your selected project will be autosuggested.
- Click Copy to finish importing files into your project.
The files will display in the Files tab of your project. Learn more about file tags within a project below.
Manage file tags within a project
To manage file tags within your project, first navigate to your project. From the Files tab of your project, you can:
- Add or edit tags for your files
- Remove tags from your files
- Filter files via their tags
Add or edit tags for your files
To add tags to files within a project:
- Select a file.
- Click Edit tags and choose "Add tags".

- In the pop-up box, enter one or more tags separated by commas. Any previously used tags in your selected project will be autosuggested.
.jpg")
- Click Add to finish tagging.
Remove tags from your files
To remove tags from files in your project:
- Select a file.

- Click Edit tags and choose "Remove tags"
- Choose to either remove specific tags or use "Remove all tags" to remove them all.
.jpg")
- Click Remove to finish removing tags.
Filtering tags within a project
To filter tags:
- Access your project.
- Click the Files tab.

- Click Tags.
- Select a tag or multipl you want to use as a filter.
- Click Apply.
Copying files between projects
When you copy files between projects, you will be prompted to tag your files as you import them into a project.
To copy files between projects:
- Access your project.
- Click the Files tab.
- Select files you want to copy.
- Click Copy and select the target project.
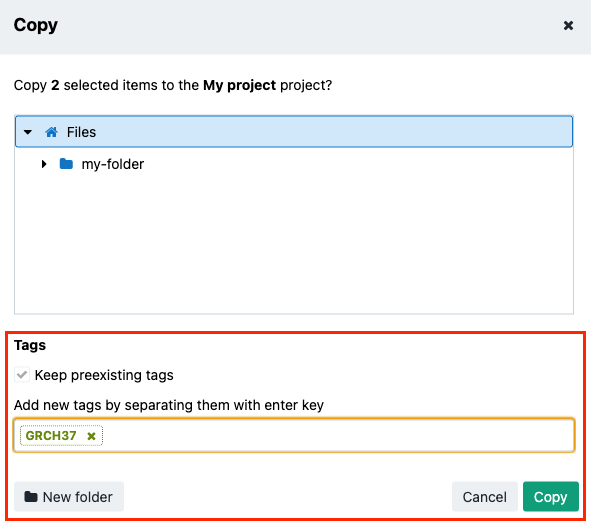
- Under "Tags" enter one or more tags, separated by commas (note: the "Keep pre-existing tags" option is selected by default).
- Click Copy to finish importing files into your project.
Updated about 2 years ago