Import CDS data
For information on currently available CDS data on the CGC, the details and history of CDS data updates.
About the CDS
The Cancer Data Service (CDS) is a data repository under the NCI's Cancer Research Data Commons (CRDC) infrastructure for storing cancer research data generated by NCI funded programs. Its data is stored in the Database for Genotypes and Phenotypes (dbGaP) database provided by National Center for Biotechnology Information (NCBI). CDS hosts datasets that contain controlled access data, with access permissions being controlled by dbGaP.
CDS data can be imported to the CGC in the following ways:
- Using the integrated Cancer Data Service Explorer on the CGC
- Using a manifest file generated on CDS portal
If you are trying to import data classified as controlled from CDS to the CGC, you need to be logged in to the CGC using an eRA Commons account with access to controlled data.
Please note that the Seven Bridges team strives to keep the data available for import on the CGC aligned with CDS data updates. However, CDS updates are not instantly available for import on the CGC. Find out the currently available releases of CDS data on the CGC.
Import CDS data using the Cancer Data Service Explorer
Please note
The CDS Explorer will be deprecated on July 1st 2024 and all the datasets will be available on the CDS Portal.
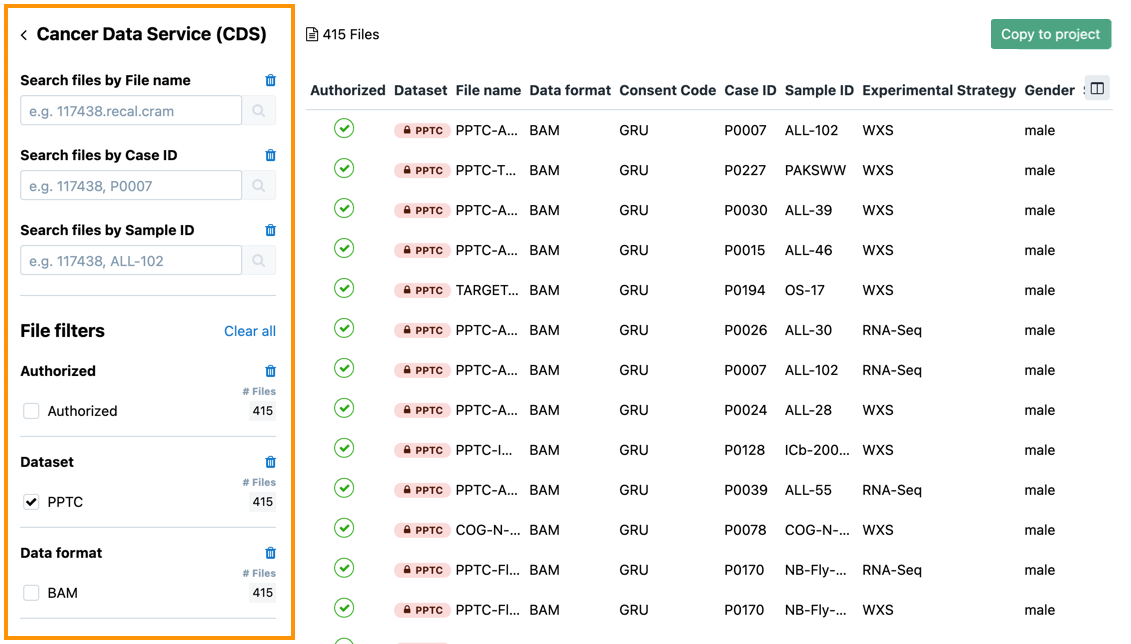
Cancer Data Service Explorer is an integrated dataset file explorer on the CGC that allows you to filter and select the exact data that you want to analyze further, and then perform a seamless import into a project on the CGC using the steps described below:
- While on the CGC's main dashboard, on the main menu bar click Data > Cancer Data Service Explorer.
- Click Explore files. File explorer opens.
- Use the search boxes and filters in the left pane to select the data that you want to analyze further.

- Once you have selected your set of data, click Copy to project in the top-right corner. Copy dialog opens.
- In the Select project dropdown select a project that you want to export the files to. If you want to import data to a new project, click Create new project. If the import contains controlled data, such data can only be imported in a controlled project.
- (Optional) Once you have selected a project, enter file tags in the Add tags field.
- In the Resolve naming conflicts dropdown select the action to be taken if a file with the same name already exists in the target project.
- Click Copy. Your files will be exported to the selected project.
Import CDS data using a manifest file
The process of importing CDS data to the Cancer Genomics Cloud (CGC) using a manifest file generated on CDS Portal consists of the following two stages:
- Searching for data and downloading a manifest file from CDS Portal.
- Importing files to the CGC based on the downloaded manifest file.
Procedure
Manifest files contain information about the data you want to import in the second stage of this process.
To download a manifest file:
- Open the CDS Portal.
- Click Data in the main navigation bar at the top of the page.
- In the filters section on the left, select criteria to narrow down the cases list.
- Click Files.
- Select the files and click Add Selected Files.
- Click FILES in the top right corner of the page. The information about the number of added files is also shown.
- (Optional) You can delete the files that you do not want to import on CGC.
- Click Download Manifest button. Manifest file will be saved on your computer. The rest of the steps are done on the CGC.
- Access the project you want to import the files to.
- Once in the project, click the Files tab.
- Click Add files > Import from a manifest file.
- In the Import files from dropdown, select Cancer Data Service (CDS).
- Click Browse files and select the manifest file from your local machine, or drag and drop the file onto the marked area. Alternatively, if you have already uploaded your generated manifest file to a project, click Select manifest from project and select the file.
- (Optional) In the Add tags field add the keywords (tags) that describe the imported items.
- Resolve naming conflicts - Select the action to be taken if a naming conflict occurs. Available actions are Skip (default option) and Auto Rename. Read more about naming conflicts resolution.
- Click Import. The file import process starts and you are taken to the Files tab.
Updated 8 months ago
